

Web Stalker User Guide

- Details
- Category: User Guides
- Published on Sunday, 05 July 2015 22:49
- Written by Christian Dunn

Web Stalker monitors the response status of web sites. The application can be scheduled using the Windows Task Scheduler to run and check local or remote web servers and can send an email notification to advise when issues are identified.
Web Stalker is Free.
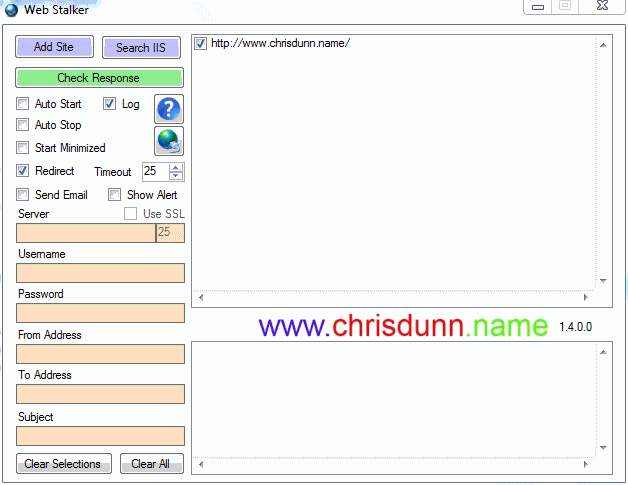
Web Stalker is easy to use with all features displayed in one interface.
Getting Started
- Click Add Site to add a web site URL.
- Enter the URL you wish to monitor
- Specify any options.
- Click Check Response to check for alerts.
If you are running the application on a machine with IIS installed press Search IIS to find all virtual directories in the default website and have their URLs prepopulated. You can use parameters to change the target machine, site to search and filter to apply.
Monitors
- Redirect occurring 3xx codes
- Bad response 4xx codes
- Server error 5xx codes
- Response timeout
Features
- Add Site will prompt the user to manually enter a website
- Search IIS will search IIS for virtual directories on the target machine with the specified site and filter (see parameters). The default options will find all virtual directories in the default website and populate the URLs.
- AutoStart will automatically check sites as soon as the program starts. This is ideal for automatic scheduling.
- AutoStop will close the program after a check is complete. This is ideal for automatic scheduling.
- Log will generate a CSV file with the alert information any time an event occurs.
- Start Minimized will run the program minimized in the taskbar.
- Redirect allows the monitor to follow web redirects and not alert on 3xx codes
- Timeout allows you to specify a timeout for the web response. This timeout is in seconds.
- Show Alert will send a popup alert to all users on the current machine (on XP requires Messenger service to be enabled).
- Send Email will send an email to the specified email address whenever an alert is raised.
- Use SSL specified secure email transmission.
- Email Server specifies the server used to send email.
- Username and Password are optional and can be used if your email server requires authentication.
- From Address is the address email will come from.
- To Address is the address email will be sent to.
- Subject allows a custom subject to be specified for the email
- You can use "<computer>" in the email subject and the computer name will be inserted when sent.
- Clear Selections will clear all selected sites.
- Clear All will remove all sites.
- Settings are saved in an ini file that is automatically created in the same folder as the executable.
Selecting any command in the list and right clicking will display an option menu:
- Open URL will launch the selected URL in your default web browser.
- Remove URL will allow you to remove the selected URL from the list.
INI File
- FollowRedirect={True|False} Allows web redirections to be followed and does not alert on 3xx codes.
- Timeout={number} Specifies seconds to timeout.
- AutoStart={True|False} Automatically runs a check when application starts.
- AutoStop={True|False} Automatically closes application after running a check or after 15 seconds.
- Minimised={True|False} Starts application minimised.
- SendEmail={True|False} Sends an email when an alert is triggered.
- EmailSSL={True|False} Use SSL for sending email.
- EmailServer={smtpserver} Specify email server for sending email.
- EmailPort={port} Specify port for sending email (Default: 25).
- EmailUsername={username} Specify username for sending email.
- EmailPassword={password} Specify password for sending email.
- EmailTo={email} Specify recipient address for alert emails.
- EmailFrom={email} Specify sender address for alert emails.
- EmailSubject={subject} Specify email subject(can include variable).
- AlertToFile={FilePath} Specify target location to generate HTML alert notification if alert is triggered (can include variable).
- TargetMachine={computer|ip} Used for IIS search or reporting/notifications.
- Execute={FilePath} Specify application to execute if alert is triggered.
- Log={True|False} Creates a log file and records triggered alerts.
- SendAlert={True|False} Shows a popup message on the current machine if an alert is triggered.
- IISsearchSite={W3SVC/1/ROOT/} The IIS site to search for virtual directories.
- IISsearchFilter={} A contains filter run against virtual directories to be added.
Command Line Parameters
- /INI={FilePath} Specifies ini file to use for settings (Default: application-path\application-name.ini).
- /LogFile={FilePath} Specifies file to save log file if enabled (Default: application-path\application-name.csv).
- /AutoStart={True|False} Automatically runs a check when application starts.
- /AutoStop={True|False} Automatically closes application after running a check or after 15 seconds.
- /Minimised={True|False} Starts application minimised.
- /TargetMachine={computer|ip} Only used for including custom server name in monitoring alerts.
- /Execute={FilePath} Specify application to execute if alert is triggered.
- /Log={True|False} Creates a log file and records triggered alerts.
- /SendAlert={True|False} Shows a popup message on the current machine if an alert is triggered.
- /AlertToFile={FilePath} Specify target location to generate HTML alert notification if alert is triggered (can include variable).
- /IISsearchSite={W3SVC/1/ROOT/} Override the targeted IIS search site for finding virtual directories.
- /IISsearchFilter={} Override the contains filter to apply when finding IIS virtual directories.
Installation
Web Stalker has been tested on Windows XP,2003,Vista,7,8 and 2008 and requires the .Net Framework 3.5 to be installed.
You can download the .NET Framework from here: http://www.microsoft.com/en-au/download/details.aspx?id=21
Web Stalker does not require installation. The executable can be located anywhere on your computer and settings file is automatically created in the same location when the program is run.
The configuration and log file are specific to the name of the executable. If you would like to run multiple instances of this application in the same location to monitor different criteria you can create a copy of the exe file and rename it and a new configuration and log file will be created to match the new name.
Scheduling
Web Stalker does not include scheduling capabilities but can be easily scheduled using Windows Task Scheduler. This is designed so that the program can run even if you are not logged on to the server/computer. Simply create a new scheduled task in windows and specify the option to 'run whether user is logged on or not' and remember to select AutoStart and AutoStop. The program will now run on the schedule you define.
Find out how to Schedule multiple Stalker applications or commands with Stalker Go