

Alerts User Guide

- Details
- Category: User Guides
- Published on Monday, 25 August 2014 00:26
- Written by Christian Dunn

Alerts is a broadcast messaging application which can be run from any web server with no installation. This small clickonce application allows any business to create user accounts for their clients and broadcast status messages. This makes it ideal for service providers, managed services providers and software as a service providers so they can communicate real time events to their customers.
All data is generated in a single XML data file encrypted using a combination of MD5 and SHA1 security that can be easily posted on any website. Upon login users receive the latest updates from your XML and a callback feature allows you to check when customers have last logged in and received an update. Messages are formatted in HTML allowing ultimate flexibility in their look and feel, the application refresh rate, notification size and more.
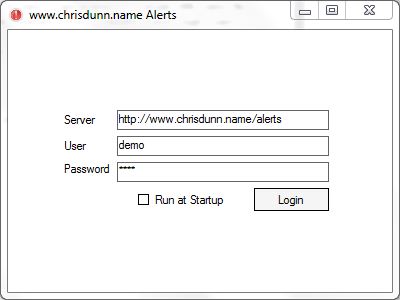
Connecting as a user
- Specify the server URL as advised (this only needs to be the path URL and should not include the filename)
- Enter the preferred username and password then press login (both username and password are case sensitive)
- Selecting Run at Startup will launch the application when you login.
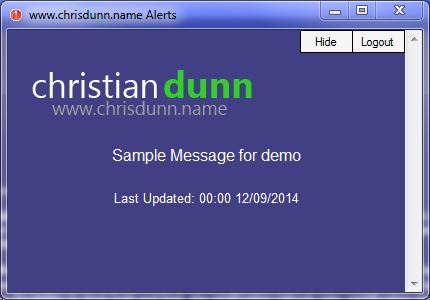
Alerts can run minimised unless an updated message is received. When this occurs the system will beep 3 times and the notification window will return to show you the latest message.
Demonstration Accounts
- SERVER: http://www.chrisdunn.name/alerts
- LOGIN/PASSWORD 1: demo / demo
- LOGIN/PASSWORD 2: demo1 / demo1
Creating Content
- Specify the user name as 'admin' and enter your desired password.
- Create your template. The Title and HTML Content is common for all clients. The client data column headings in capitals can be used as dynamic elements in the HTML in this format e.g. "<br>[CONTENT]<br>[UPDATED]"
- Leave the Callback empty unless you want to create callback notifications (see below)
- Create clients and specify their login credentials and custom content data.
- Create the XML file and post it to your preferred server
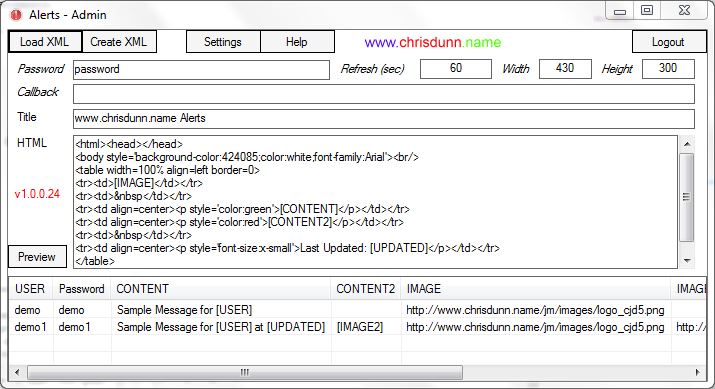
The Content Creation Window
- The Password field specifies the admin password you must use to be able to load and edit this content.
- The Refresh (sec) field specifies how frequently the client will check for updates.
- The Width and Height allow you to customise the size of the client notification window.
- The Callback field is used for callbacks (see below)
- The Title replaces the application title with your custom name.
- The HTML field provides the main content template.
- Content is parsed in the following order with dynamic data automatically inserted as specified. You can insert individual content items into any item higher in the processing order. When inserting an item dynamically into the content it must be formatted in square brackets (i.e. [CONTENT]) as shown in the image below.
- HTML
- CONTENT
- CONTENT2
- IMAGE
- IMAGE2
- UPDATED
- USER
- Image URLs specified in the Image fields are automatically converted to HTML Image references and inserted in the content at the specified location.
- The Preview button will create a HTML page and open it in your browser showing how the generated content will look for each client. This can be used to review the content before it is published.
The clients grid at the bottom of the screen will list each client and their current configuration.
Double click any client to edit their details.
Right clicking on any client will provide a menu of options:
- Add - Create a new client
- Copy - Creates a new client by copying all data (except username and password) from an existing client.
- Bulk Update Content - Allows you to modify multiple records at once
- Delete - Deletes the selected client
You can load an existing XML file using the "Load XML" button.
Data is only saved when you select "Create XML" and generate the updated XML file.
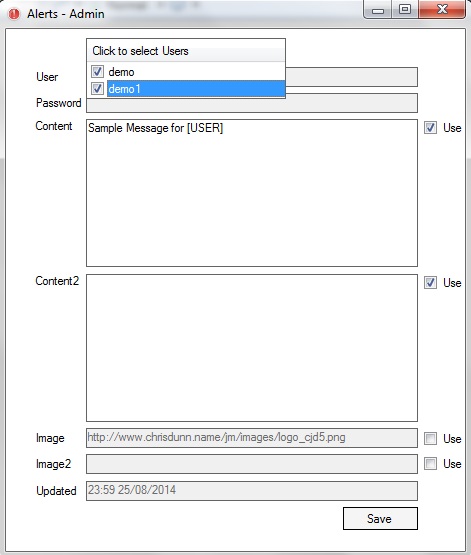
Using the Bulk Update Content feature
This feature provides an easy way to update multiple clients rapidly. When you launch Bulk Update Content the content from the currently selected client will be loaded.
Click on the user selection button and check the box for each client you want to update. With this feature you can update the Content, Content2, Image and Image2 fields only. The updated timestamp will be automatically updated on all records. For each field that you want to update on all clients ensure the "Use" flag is ticked so you can edit the appropriate field. If you uncheck the "Use" flag then content in that field will not be copied to the selected clients.
Once you have finished updating the data press 'Save' to review your updates in the content creation window.
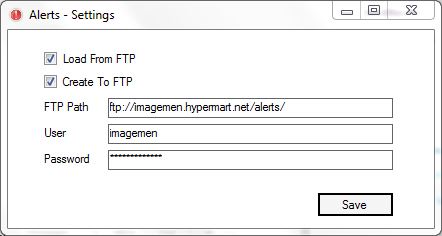
Updating Content using FTP
In the Admin section under Settings you can specify FTP credentials to automatically load and save the XML from your web server when you select the Load XML or Create XML options. If you are do not enter FTP details then you will be prompted to select the file path when creating or loading the XML data.
Enter the full filepath to the FTP location in the FTP Server field as shown below
Callbacks
A callback URL can be specified in the admin settings. When content is refreshed for a client a POST request is sent to the specified URL containing the username using a variable called USER. This can be used to track when users have last logged in to the application.

Sample Data
- The alerts.zip file includes callback scripts for Perl/CGI and ASP websites. These scripts will generate a file named for each user who connects to your content containing the date and time the user last connected. To use callbacks simply specify the URL to this file (i.e. http://myserver/callback.asp)
- The alerts.zip file includes sample content files for testing. The password for the sample content is 'password'.
| 3 kB | 2014-08-26 |