
Print Queue Manager User Guide

- Details
- Category: User Guides
- Published on Wednesday, 02 July 2014 00:39
- Written by Christian Dunn

 Print Queue Manager gives you complete control over a printer queue allowing you to pause, delete and resume all documents. It can save you paper and ink or toner by giving you control over your print flow. The application runs at the user level so it complies with your corporate security policy for managing printers and documents making it suitable for customer service location such as internet cafes and libraries.
The power behind Print Queue Manager is the AutoQueue function which will turn the selected printer into a controlled print server queue. Jobs will be stored until they are manually released individually or in bulk. You have complete control over jobs and printers and you can delete unwanted jobs. The Cleanup feature allows you to set the program to print or delete all remaining jobs at a certain time of day and the Payments feature allows you to calculate charges and record payments made for print jobs.
Installation
Installation is performed from the link provided on the Print Queue Manager page. As a Microsoft ClickOnce application installation and application settings are now per-user. On a shared machine it is recommended after installation to change the database location to a common folder and configure the application. Once this is complete application settings can be backed up to a file and imported for all subsequent installations. This process can also be used to restore application settings if they are reset. Uninstalling the application does not remove the database or backed up application settings.
This program does require the ability to connect to our servers to complete installation and check for updates. This can be affected by networks running proxy servers or firewalls which may block this. If you receive a message reporting an error occurred trying to download files this is the likely cause. If required an offline version is available. Download and unzip the files from here to a folder on your computer. A script and link is included to confirm you have the correct .Net version (4.5) prior to installation. Run the file PrintQueueManager.application to start the installation.
Please see these links for installing on Citrix or Terminal Services.
Updates
Print Queue Manager will check for updates if an internet connection is available when the program is launched. If no connection is available the update check will be skipped. You can choose to skip updates but this is not recommended. You can take a backup of the application settings so you can restore these in the event an installation problem occurs.
Getting Started

- Click Find Servers to select from a local server or enter the name of a server in the field provided
- Click Find Printers to load a list of printers on that server
- Select the appropriate printer from the list
- Tick the Monitor option to monitor this print queue
- Tick the AutoQueue option to manage this queue
Printer Configuration
As with previous versions of Print Queue Manager only network printers can be monitored and queued. Even if you are managing printers on your own machine you need to share these printers first.
To learn how to share a printer follow these steps from Microsoft.
Printer Queue
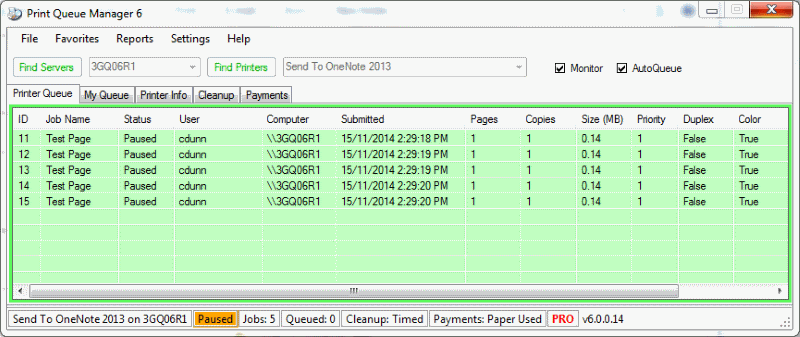
This tab is your live view of jobs that are being queued for this printer. You can sort this grid by double clicking on any column heading and you can drag and drop column headings to rearrange the order they are displayed.
You can use the CTRL and SHIFT keys to multi select items in the print queue to action together.
The status bar will update regularly to show you the current queue, status of your queue, the number of jobs, the number of jobs queued to be actioned, your cleanup mode, payment mode, licencing and version.
Monitor Mode
When the Monitor option is enabled print jobs are displayed in the Printer Queue tab. All jobs are logged in the application database for ![]() users. In Monitor Mode only the Printer Queue and Printer Info tabs are enabled for you to control the printer.
users. In Monitor Mode only the Printer Queue and Printer Info tabs are enabled for you to control the printer.
AutoQueue Mode
When the AutoQueue option is enabled jobs are automatically queued and will appear in the Printer Queue tab. All jobs are logged in the application database for ![]() users. Jobs can be selected from the Printer Queue tab and from the right click menu these can be sent to print or delete or can be updated with specific comments. Double clicking on an individual job will send that job to be printed. In Autoqueue mode when a print job is actioned it is added to the My Queue tab so you can see all of your pending action items. These will be processed in order.
users. Jobs can be selected from the Printer Queue tab and from the right click menu these can be sent to print or delete or can be updated with specific comments. Double clicking on an individual job will send that job to be printed. In Autoqueue mode when a print job is actioned it is added to the My Queue tab so you can see all of your pending action items. These will be processed in order.
In AutoQueue Mode the My Queue, Cleanup and Payment tabs are also enabled.
My Queue

This tab is your custom action list and is only enabled when in AutoQueue mode. Print jobs that you send to print or delete will show a status of "Queued" on the Printer Queue tab and will appear on this tab to be actioned. These jobs are actioned in the order they are added. You can change the order these jobs are actioned by selecting a job you would like to move and using the up and down arrows on your keyboard to change it's location in the list. The right click menu on this tab allows you to remove a pending job action.
Printer Info

This tab displays information for the currently active printer and provides easy access to Printer Properties. In AutoQueue mode you can print test pages and view printer properties from this tab. In Monitor only mode you can also pause and resume the printer.
Cleanup

This tab is enabled in AutoQueue Mode and allows ![]() licenced users to specify the cleanup options for jobs. This feature was previously called "AutoRelease". The Cleanup feature can be set to Timed or Automatic and the mode can be set to Print or Delete.
licenced users to specify the cleanup options for jobs. This feature was previously called "AutoRelease". The Cleanup feature can be set to Timed or Automatic and the mode can be set to Print or Delete.
Timed cleanups occur when the time specified matches the current time and jobs are automatically actioned if the program is running this queue at this time. You can specify the time this occurs. Automatic cleanups occur every minute.
The Cleanup Mode specifies the action to be performed with jobs in the print queue. Additional options can be configured to only cleanup jobs that are larger than a specified size or older than a specified time and these will appear depending on the cleanup type selected. This feature can only be used when AutoQueue is enabled.
Payments

This tab is enabled in AutoQueue Mode and allows ![]() licenced users to specify payment options for jobs.
licenced users to specify payment options for jobs.
Payments can be configured in two modes. Paper Used calculates the cost of jobs based on the number of pieces of paper used. Pages Printed calculated the cost of jobs based on the number of pages printed (ink used). You can specify the cost for color and greyscale prints in dollars below (i.e. 0.05 means 5 cents per page). The rate chosen is used on the print properties when the job is printed, not on the content of the page.
The Round Cash to 5c option rounds the total to pay up to the nearest 5 cents when cash is chosen as the payment type. The Require Customer option requires a customer name to be entered. If this is not selected a name of 'General Transaction' is recorded for all payments.
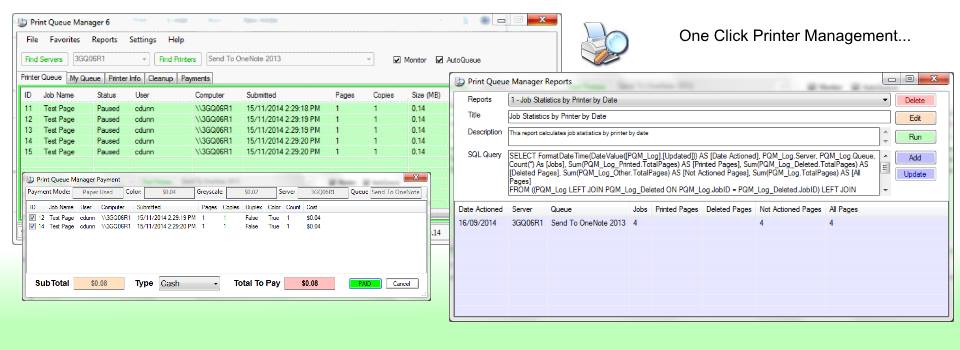
When Payments is enabled and a user attempts to print jobs from the print queue a new window will appear.

This screen displays the payment mode, costs and active print queue. The user can select which jobs are to be included in this payment and the payment type which will automatically calculate the total amount to pay.
Right clicking on an individual job will allow the user to edit the payment cost for that job. The Total to Pay can also be manually modified to include any additional costs or adjust the total accordingly.
When the PAID button is pressed the payment is recorded and the relevant jobs are submitted for processing.
Database

Jobs are recorded in a database for licenced ![]() users. This database can be configured from the Database option in the Settings menu. If you choose a new location for your database using the folder icon a new database will be created when you press OK. To open the data location double click in the database location field. You can disable the recording of jobs by selecting the Disable Job Logging option. The Archive function will create an archive of your current database, create a fresh database in the same location and migrate any custom reports and favorites from the old database to the new database. The Backup function will make a backup copy of your current database. The Delete function will delete your current database and create a new one.
users. This database can be configured from the Database option in the Settings menu. If you choose a new location for your database using the folder icon a new database will be created when you press OK. To open the data location double click in the database location field. You can disable the recording of jobs by selecting the Disable Job Logging option. The Archive function will create an archive of your current database, create a fresh database in the same location and migrate any custom reports and favorites from the old database to the new database. The Backup function will make a backup copy of your current database. The Delete function will delete your current database and create a new one.
When the database is enabled the server list will allow you to select servers from all servers you have previously recorded job data for.
Licencing

If you have a ![]() licence for Print Queue Manager you can enable additional features. Licencing now performs an online validation to check that you the quantity of licences you have and the number of machines it is being used on. If your licence fails online validation and you believe this to be incorrect please contact me to review and reset your licence usage count. Online validation requires an internet connection and must be performed on each computer the application is installed on. If an error occurs with online validation a manual validation window appears allowing you to retrieve and enter an activation code.
licence for Print Queue Manager you can enable additional features. Licencing now performs an online validation to check that you the quantity of licences you have and the number of machines it is being used on. If your licence fails online validation and you believe this to be incorrect please contact me to review and reset your licence usage count. Online validation requires an internet connection and must be performed on each computer the application is installed on. If an error occurs with online validation a manual validation window appears allowing you to retrieve and enter an activation code.
- Open Licence from the File menu
- Select the appropriate licence type (Licences from previous versions are "v5 Pro Licence")
- Paste your licence in the box provided
- Press Validate
- After confirmation press Save to save your licence.
Reports

The reports window for ![]() licenced users provides easy access to a suite of standard reports which can be run within the application and exported to CSV or HTML. Running a report is as easy as selecting it from the reports list and pressing Run. To export a report right click on the grid to show the export menu options.
licenced users provides easy access to a suite of standard reports which can be run within the application and exported to CSV or HTML. Running a report is as easy as selecting it from the reports list and pressing Run. To export a report right click on the grid to show the export menu options.
The Edit button provides access to the report query and additional functions. You can modify an existing report and save it as a new report or update any of your own custom reports. Choosing the <New Report> option will provide you with a blank canvas to create your own reports. Reports use Microsoft Access SQL to query the database.
Favorites

The favorites window for ![]() licenced users provides an easy way to save your favorite printer and application settings for quick access. You can view these in tile mode as shown above or in details mode to see all settings that are saved.
licenced users provides an easy way to save your favorite printer and application settings for quick access. You can view these in tile mode as shown above or in details mode to see all settings that are saved.
Favorites can be launched by double clicking on the appropriate printer or a right click menu is available to open, rename or delete a favorite. Favorites are now stored in your database. You cannot change printer if there are jobs in the My Queue waiting to be printed or deleted on your current active printer.
Troubleshooting
If a problem occurs or invalid data appears in the print queue this can usually be corrected by turning off Monitor and AutoQueue.
In a non-domain windows network where the application is run on a different computer to the print queue it is advisable to ensure the same user account is setup on both machines with the same credentials and permissions.
If you identify a new issue please log a support ticket or contact us so we can investigate.